
In general a Stencil Art Lesson Plan ensures a step by step procedure for kids to create their own stencils. Of course this adds even more fun to art lessons for kids. Bear in mind that with a Stencil Art Lesson Plan there are engaging techniques and much enthusiasm for both teachers and kids.
Subject: Art
Grade Level: 1 – 4
Objective: Students will create simple stencil art designs using basic shapes.
Standards: Students use art materials and tools in a safe and responsible manner. Equally important is that they will apply techniques, assess their work and the work of their peers.
Time: Approximately 1 – 2 lessons (depending on designs)
Vocabulary: design, stencil, stencil art, pattern, basic shapes, square, circle, triangle, rectangle
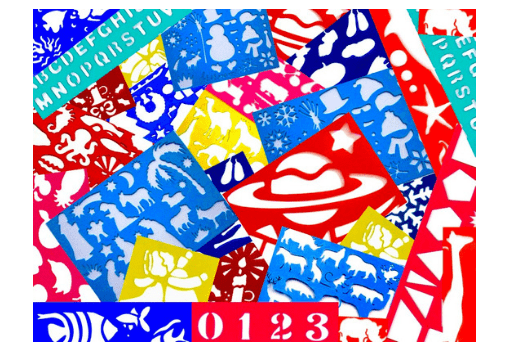
Materials: basic stencil shapes, construction paper, pencils, crayons, markers, scissors, tape
RELATED: Kids Stencils Drawing
Affiliate Disclosure: artofstencils.com is a participant in the Amazon Services LLC Associates Program, an affiliate advertising program designed to provide a means for sites to earn advertising fees by advertising and linking to Amazon.com and affiliated sites. “As an Amazon Associate I earn from qualifying purchases.”
Assignment Overview
Students will work in pairs with different stencils to create designs.
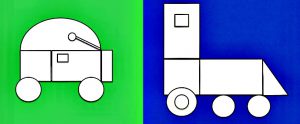
For example, students can make a tractor, or a buggy car. They can use each stencil repeatedly and exchange shapes with others in their group. Additionally, students can overlap shapes, or use a part of a shape to be creative.
By all means, students can display their work of art on bulletin boards in the classroom, or other areas around the school.
Preparation
To be sure, remember to prepare all materials ahead of time for this Stencil Art Lesson Plan,.
- Print enough pre-made stencils for students to use in pairs.
- Have Construction Paper 9 x 12, one for each student. As a matter of fact, the Pacon 6555 Rainbow brand is one of the best to use for this activity. Nevertheless, teachers no doubt will use whatever they have available in their classroom. Bear in mind that there is no need to buy extra materials for this lesson.
Warm up Activity
For this activity students work in groups of 4. They will quickly discuss among themselves the names of the basic shapes. Each student will draw a basic shape on an index card. Following that, students will color the shape, cut it out and glue it on the construction paper.
Introduction
1. Discuss briefly the history of stencils with students.
Notably: Painting stencil patterns have been around for more than 9,000 years. In particular, early man would put their hands against the walls of caves and use paint or charcoal to draw outlines.
To point out, the cut out template that forms the image is what is used for stenciling. However some people do use the other parts that are not cut out as well.
RELATED: Benefits of Stenciling for Kids
Stencil Art Lesson Plan
2. Allow students to watch this short video example of stencil art with basic shapes.
3. Discuss the concept and techniques shown in the video.
4. Hand out different shapes for students to cut out their stencils, making sure students identify and name each shape.
5. Demonstrate how to cut out stencils with a pair of scissors. For one thing, remind students of the correct and safe use of the scissors.
6. Discuss with students the similarities and differences of the stencil outlines and how each one can be used to create a design. Point out the the simplicity of the stencil and how easy it is to recognize. To emphasize, discuss the shape so that students understand its message immediately.
Teacher and Students Practice Activity
In this Stencil Art Lesson Plan, both teacher and students practice examples of the actual activity to reinforce understanding.
7. Brainstorm designs that students can make. For instance a tractor as shown in the video above. Use shapes to make an example.
8. Allow students to demonstrate other ways of how the shapes can be placed to show creativity.
Independent Students Activity
9. Hand out construction paper and demonstrate how students should tape the stencil outlines on the paper.
10. Following that, students then draw along the stencil outlines with pencil, crayons, or fine point markers. At this point, they now color the entire outline on the construction paper. Surely, they can color each shape as vibrant as they so desire.
11. To be sure, demonstrate how students should carefully remove each stencil after coloring the shape.
12. With attention to the design in mind, students repeat the process of taping shapes, drawing outlines and coloring them. By all means, encourage students to overlap the stencils and change colors as desired.
Closing
Students show and discuss their art designs with the class using the vocabulary for this Stencil Art Lesson Plan.
RELATED: Easy Drawing Templates
Stencil Art Lesson Plan: Paint Alternative
In case you want students to use paint, then you can do so with tempera paint and a damp sponge. Must be remembered that if the paint is too thick, then add a little water and check the viscosity.
By the same token, make sure the sponge is damp enough. Another key point is that the paint will run if the paint is too thin, so test it out before you start painting.
To clarify, if kids overload the sponge it will cause the paint to run behind the stencil, and of course this will spoil the design. On the other hand, if you do not use enough paint, the image may not look vibrant. To repeat, if students use a sponge, then they should apply the paint gently.
For fear that kids may smear the edges, encourage them to dab the sponge from the stencil. Remind them that if they dab towards the stencil, the paint might just smear the edges. For fear that this may happen, you can get GooMart 40 Pack of Craft Finger Sponge Daubers here. No doubt, these are some of the best sponges that both kids and adults can use.
To demonstrate how to dab a stencil correctly, watch this short video.
In the event that you would like to use this lesson for grades 3 – 4, then the task can be a bit more challenging. By all means, you can use different shapes to take the designs up a notch. Of course adjustment is the key to meeting kids at their level.
Assessment and Learning
Certainly this can be used to assess students’ progress through discussions and observation. Certainly kids can assess their work and the work of their peers. In fact, they get to share their reflection of the lesson with the entire class. Surely, this is a perfect way for them to show off their artistic side.
Remember also that when kids showcase their work in other areas around the school, they may very well be ideas for others to try. In addition to that parents and other visitors to the school will get to see some of the kids creative activities.
Stencil Art Lesson Plan: Extended Activity
Specifically students will write a description of where they can find the basic shapes inside or outside.
Hope you are happy with your experience at artofstencils.com. If you have any questions, concerns or suggestions please let us know.
Get Free Stencil Patterns Ebook with dog templates here. Feel free to share this page or leave a comment.
Read More
